Scarpa Vapor V LV (Coming Soon)
From $309.95
From $309.95
From $309.95
From $189.95
From $189.95
$149.95
From $4.95
From $369.95

Keen to build your own home woody? Here's a simple guide to help you get started on your home build.
Start by figuring out how much space you have. For a decent training woody, I would suggest that the minimum size would be 3.6m high x 2.4m wide, tilted at around 30 degrees. If you have more space, go bigger!
Tips: the best training angles are between 10-45 degrees. Vertical walls don't do much for training. Roofs are fun but not essential for serious progress.
You can also add custom woody features such as these to your design:
Draw up a design and use string lines to help visualise and maximise your space before you start cutting wood.
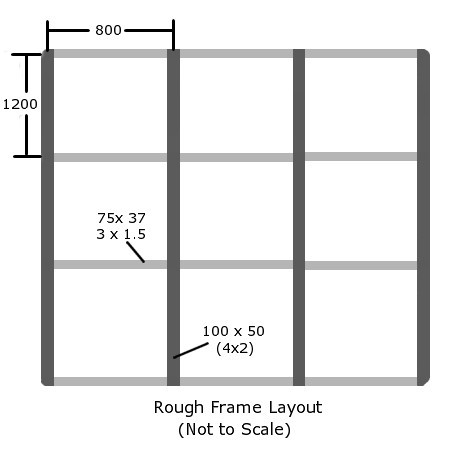
Here's what you'll likely need for the frame:
We do not include mounting materials here.

Without going into massive detail as everyone builds frames differently you want to follow these guidelines:

Depending on your situation it may now be easier to secure the frames to the wall with struts etc, or you may want to leave them on the ground and put the panels on them after you have done the next step. It really depends on the situation but it can be very hard to hold a plywood panel in place at a steep angle whilst trying to secure it to the frame.
Important: If you're securing it to a brick wall be careful that the load you create isn’t going to tear a brick out of the wall. Use 10mm Dynabolts in masonry or 3/8th bolts if fastening to timber.

Whatever you do resist the temptation to texture the panels. There really isn’t any need to paint them either unless they are outside in the elements. If you texture the panels you will just waste your money resoling your shoes, and non-textured panels make it harder to smear so you’ll get stronger.
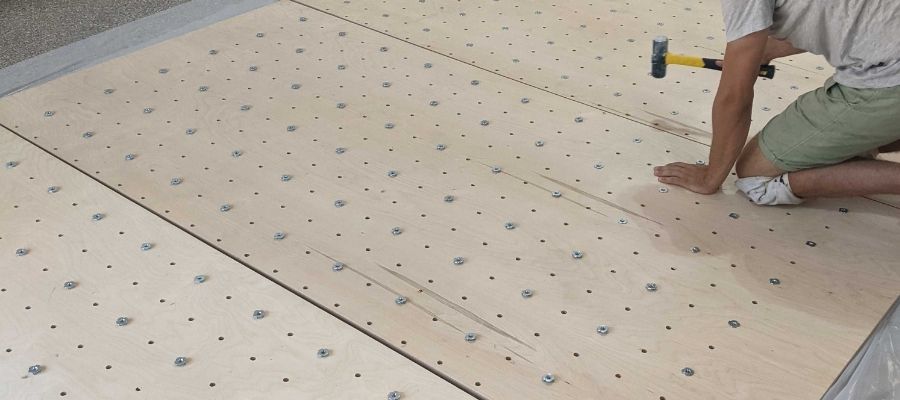
Prepare the panels BEFORE mounting them to the frame:
Once done, screw the panels onto your frame securely. Use at least 20 screws per panel, working from the edges in.

Now for the fun part: holds!
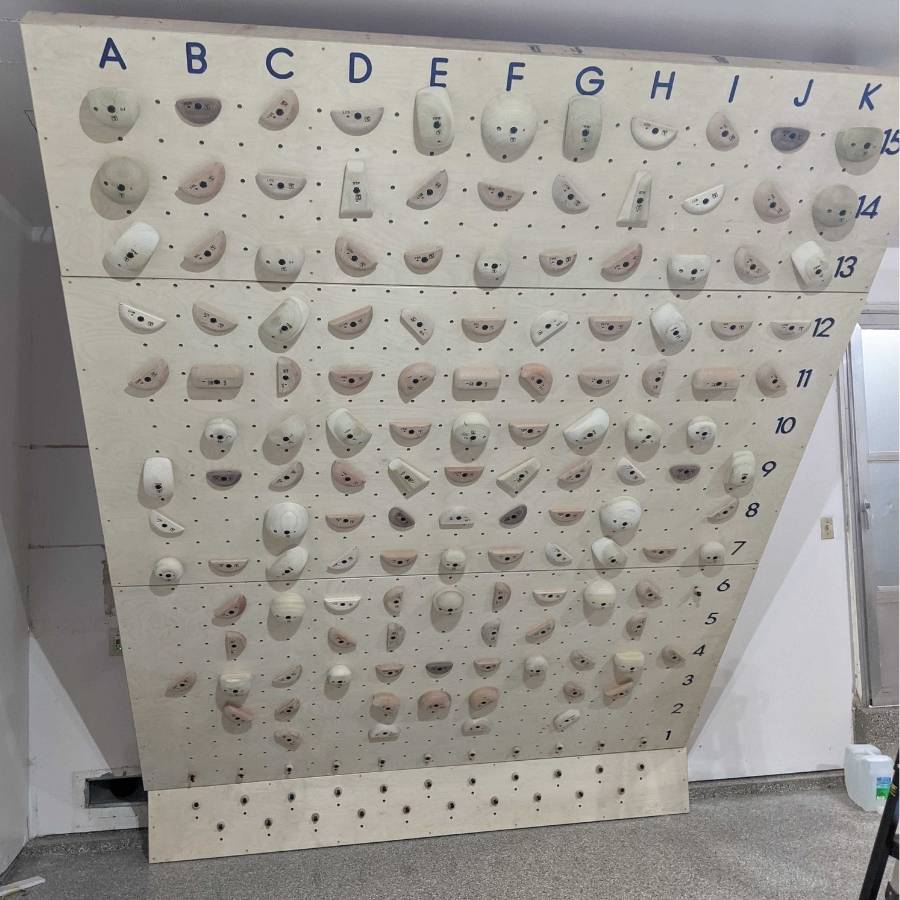
How many and what kind depends on your wall's angle, your style, and budget. For a good start:
When placing holds for the first time, don't overthink it. Throw them on semi-randomly, start climbing, and adjust as you go. Have fun!
Welcome to our website. If you continue to browse and use this website, you are agreeing to comply with and be bound by the following terms and conditions of use, which together with our privacy policy govern Climbing Anchors’s relationship with you in relation to this website. If you disagree with any part of these terms and conditions, please do not use our website.
The term ‘Climbing Anchors’ or ‘us’ or ‘we’ refers to the owner of the website whose registered office is . Our ABN is 14 604 546 590. The term ‘you’ refers to the user or viewer of our website.
The use of this website is subject to the following terms of use:
Climbing Anchors Ltd (“Climbing Anchors”, “we”, “us”, “our”) is committed to protecting your privacy. We will never share the personal, private information (including but not limited to your name, address, phone, or email) that you provide through www.climbinganchors.com.au or at a Climbing Anchors retail store. Your personal information is used solely for our own purposes in ensuring we can provide you with an agreeable shopping experience.
Climbing Anchors has designed this privacy policy to be as transparent as possible about how we collect, manage, use, process and disclose your personal information, which is subject to the privacy principles set out in the Privacy Act 1988 (Cth) and the Privacy Act 1993 (NZ) and the general law intended to protect your privacy. This will allow you to make informed decisions when shopping with Climbing Anchors.
If we ever make amendments to this Privacy Policy, they will be published here. Shopping with Climbing Anchors constitutes agreement to be bound by the terms of this Privacy Policy and that if any part of this Privacy Policy is found to be unenforceable, the remainder of the Privacy Policy remains in full effect. This Privacy Policy should be read in conjunction with Climbing Anchors Terms & Conditions, of which this Privacy Policy forms part.
Note this Privacy Policy does not apply to the practices of organisations that Climbing Anchors does not own or control, or to people that Climbing Anchors does not employ or oversee even if offers, coupons or links to their websites appear within our website or other channels.
Collection of your personal information can occur through various interactions:
The types of personal information we may collect include your name, contact details, mailing and delivery addresses, email address, date of birth, your shopping or browsing behaviours, and any other personally identifiable information that you have provided us in any form you may have submitted to us, or in the course of any other forms of interaction between you and us. We do not directly collect, store, or have access to your bank details or credit card details to process your payment or for customer service purposes. Your credit card details are collected, processed and stored directly by our third-party payment processors (Stripe, Square, AfterPay, and PayPal) pursuant to their terms of use and privacy policies. None of your credit card details are permanently stored with us. However, if you have approached us for a refund, our customer service representatives may request your bank account details when processing refunds.
In addition to the information you provide to us, we use services that automatically collect and process information from your device or browser through cookies and other tracking technology. This information includes your:
Data collected through cookies and other tracking technologies: including, but not limited to, your IP address and domain name, your browser version and operating system, traffic data, imprecise location data, web logs and other communication data, and the resources that you access. Please refer to Section ‘Third Party Cookies And Tracking Technologies’ for more information on data collected through cookies and other tracking technologies.
Information once “de-identified” (or “anonymized”) to the standard required by applicable law is not subject to this Privacy Notice and we may treat it as non-personal information, which means we could use it without restrictions nor obligation to you, except as prohibited by applicable law.
We may use and disclose your personal information for purposes reasonably necessary to provide you with an agreeable shopping experience, including to:
In addition, we may use and disclose your personal information for the following purposes, to:
We will use and disclose personal information for the primary purposes for which it was collected, and for other related purposes we consider will be within your reasonable expectations. If we use your personal information for any other purpose, we will first obtain your consent, unless we are required or permitted by law to use or disclose your personal information without obtaining your consent.
In the course of conducting our business, we may disclose your personal information to:
In limited circumstances we may provide your personal information to third parties such as co-sponsors or promoters of events we are running. In such cases we will take reasonable steps to ensure you are aware that this may be the case when the information is collected and disclosed.
We may use or disclose your personal information for the purpose of direct marketing in relation to our products, services or brand. We may contact you for the purpose of direct marketing via email. If you do not wish to receive such communications, please select the unsubscribe link in our email communications you receive or contact our customer service team and we will respect your request and cease future communications. If you do not unsubscribe in either of these ways, you will be taken to have consented to receiving such communications from us.
We do not disclose personal information we collect to third parties for the purpose of allowing them to direct market their products and services to you.
When you visit our website you can browse them, and access important information without revealing your identity. In order to improve our website, we use "cookies" to track your visit. A cookie is a small amount of data that is transferred to your browser by a web server and can only be read by the server that gave it to you. It cannot be executed as code or deliver viruses.
We use session tracking technologies or “session ID cookies” (cookies that expire when you close your browser) on www.climbinganchors.com.au to, for example, track overall site usage, and track and report on use and interaction with ad impressions and ad services.
We use the services of third-party vendors, who may implement one or more persistent tracking technologies (such as cookies, eTags, pixels, web beacons/ GIFs, local storage, or other identifiers on your device and browser settings) in order to recognise you and your device each time you visit our website. We use these technologies to enhance your online experience, such as for preference setting, offer selection, analytics, conversion attribution and fraud reduction. We use the services of third-party vendors for email acquisition, email identity, email marketing, and customer relationship management data platforms in order to help us tailor our communications to you, improve our services, better understand your interests, preferences, propensity to buy from your visits and past transactions on our website.
You may reject first-party and third-party tracking technologies through the settings on your browser. Note that this may result in the loss of website functionality, restrict your use of the website, or delay or affect the way in which the website operates.
Climbing Anchors uses certain Google Analytics functions. Please see this link for how your data is collected and this link for instructions on how to opt-out of any Google Analytics data tracking.
Climbing Anchors may use Google Analytics features based on Display Advertising, including but not restricted to the following: Smart Shopping, and Google Analytics Demographics and Interest Reporting. Using the Google Ads Settings, you can opt-out of Google Analytics for Display Advertising and customise Google Display Network ads.
If you wish to withdraw your consent for us to send you marketing communications, you can do this as follows:
Once we receive notification that you wish to withdraw your consent for receiving marketing communications, it may take up to five (5) business days for your withdrawal to be reflected in our systems. Please note you may still receive marketing communications during this period.
Note it is not possible to unsubscribe from non-promotional (transactional) communications relating to your online orders or the operation of your account.
You may remove your account by emailing our customer service team. We will process such a request within a reasonable time from receiving notice from you of your withdrawal of consent. Once the processing is complete, we will no longer collect, use and/or disclose your personal information, except to the extent we retain your personal information for compliance, regulatory or other legal purposes.
Note: If you withdraw your consent for us to use and process your personal information, we may no longer be able to provide you with the related products, services or benefits associated.
We do not disclose information to overseas recipients, and will not sell, share or rent this information to third parties in ways different from what is disclosed in this statement.
All personal information you provide to us is stored on secure servers or hard copy form, both onsite at a Climbing Anchors retail store or with our trusted service provider. Any trusted service provider must observe and meet our information security requirements to minimise the risk of unauthorised access to, and loss, misuse or unapproved alteration of, personal information.
We have in place reasonable security arrangements to ensure that your personal information is adequately protected and secured and to prevent any misuse, interference, loss, unauthorised access or disclosure of your personal information. Security measures include allocating employee specific, multifactor protected accounts for all third-party systems used to manage customer information; reasonable IT security measures such as data encryption, firewalls and antivirus controls; physical measures such as the anonymisation of paper records. We will take reasonable steps to destroy or de-identify any personal information we hold as soon as we no longer need to hold it (as permitted by law).
We will not be responsible for any unauthorised use of personal information by third parties which is attributable to factors beyond our control. We are not responsible for the online privacy practices of third parties.
Further, given that no data transmission over the internet can be guaranteed as completely secure, we cannot guarantee the security of any (personal or other) information you transmit to us, and as such we will not be liable for any breach of security or unintended loss or disclosure of information. Our websites are professionally hosted and operate in a secure environment. You should, however, be aware that there is always an inherent risk in transmitting your personal information via the Internet. Please do not enter credit card details when contacting us via email, text message or through our social media chat functions.
You may access or correct some personal information including your name, phone number, shipping and billing address by logging in to your user account on www.climbinganchors.com.au under “My Account” and selecting “Billing Details” and/or “Shipping Addresses” to edit each relevant field.
You may request access to your personal information that we hold by submitting a written request to us via emailing our Customer Service Team.
We will do our best to respond to personal information access and correction requests within 30 days. We will provide you with access to your Personal information we hold, unless we are prevented by law from doing so. Before providing such information, we may request additional information from you to confirm your identity, to protect your privacy and the privacy of others.
While Climbing Anchors makes reasonable efforts to provide our users with access to their personal information, there may be circumstances in which we are unable to provide such access, including but not limited to: where the information in question is legally privileged, would compromise the privacy or other legitimate rights of other persons, where the burden or expense of providing access would be disproportionate to the risks to your privacy, where the request is clearly excessive or unfounded, or where the information requested comprises proprietary business information. If we refuse to provide you with access to the information, we will provide you with reasons for the refusal, unless it would be unreasonable to do so. If you wish to complain about a refusal for access to your personal information, you may contact our Customer Service team. We will deal with your complaint within a reasonable time.
You should ensure that all personal information you submit to us is accurate, up-to-date, complete, relevant and not misleading. Failure to do so may result in our inability to provide you with the products and services you have requested. You should keep us updated on any relevant changes to your personal information. You may request to have your personal information that we hold corrected by contacting our Customer Service Team. We will respond to your request to make such a correction within a reasonable time.
If we refuse to correct your personal information as requested, we will provide you with reasons for the refusal, unless it would be unreasonable to do so. If you wish to complain about a refusal for correction of your personal information, you may contact our Customer Service Team. We will deal with your complaint within a reasonable time.
We will take reasonable steps to ensure your personal information likely to be used by us or disclosed by us is accurate, up-to-date, complete, relevant and not misleading. We will also take reasonable steps to notify other entities to which we have disclosed your personal information corrections once they are made.
We may need to update our Privacy Policy to comply with laws or to reflect changes to our business practices from time to time. Any updates will be posted on our website, and we encourage you to check our website periodically to ensure that you understand our current privacy policy. If you use our website after the Privacy Policy is updated, you will be bound by it. We will notify you if there are any changes to this Privacy Policy that materially affect how we collect, use or process your personal information.
If you have any queries, concerns or complaints about our handling of your personal information or about this Privacy Policy, or would like to request access to or correction of your personal information we hold, please contact our customer service team at the below details:
Email: info@climbinganchors.com.au
Telephone: 1300 421 585 (AU)
If you consider your privacy concerns have not been resolved satisfactorily by us, or you wish to obtain more information on privacy requirements, you can contact:
Australia Office of the Australian Information Commissioner on 1300 363 992 or visit their website at www.oaic.gov.au
New Zealand Privacy Commissioner (New Zealand) on 0800 803 909 or visit their website at www.privacy.org.nz
Last Updated: [@date_updated@]